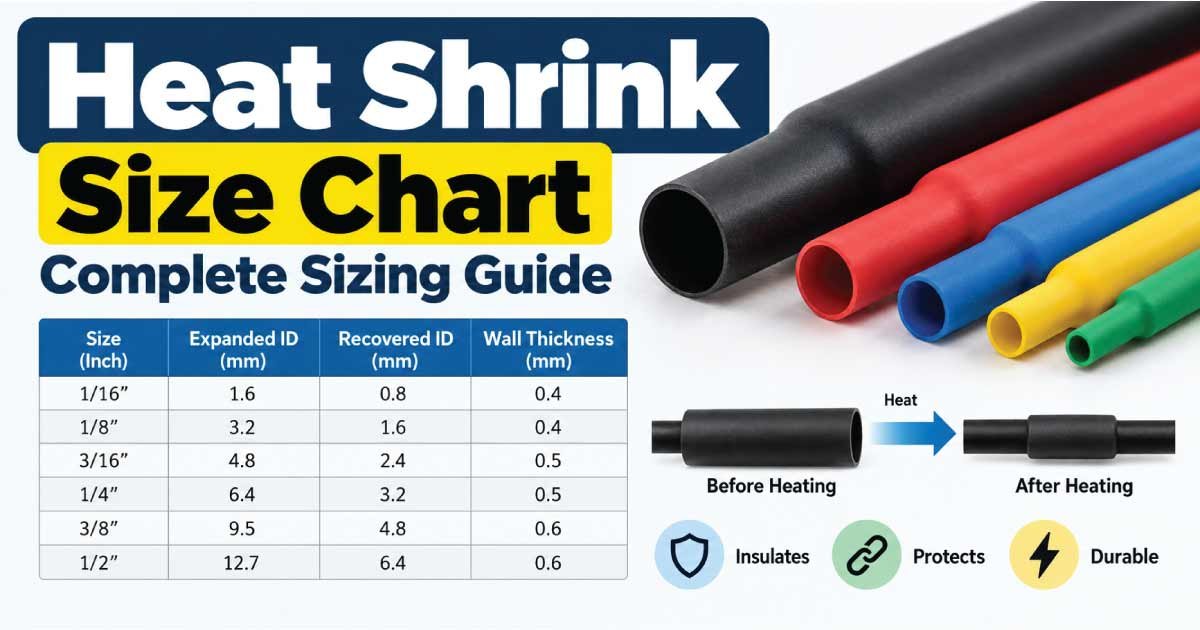
A helps you choose the correct tubing size for protecting, insulating, bundling, and sealing electrical wires and cable connections. Selecting the right size is important because heat shrink tubing must fit over the connection before heating while shrinking tightly around the finished assembly afterward.
Heat shrink tubing is commonly available in sizes such as 1/16 inch, 3/32 inch, 1/8 inch, 3/16 inch, 1/4 inch, 3/8 inch, 1/2 inch, 3/4 inch, 1 inch, and larger diameters. Metric sizes are also widely available.
The correct heat shrink size depends on the expanded inside diameter, recovered inside diameter, shrink ratio, wall thickness, cable diameter, and application.
What Is Heat Shrink Tubing?
Heat shrink tubing is an insulating material that contracts when heated. It is commonly manufactured from materials such as polyolefin, PVC, fluoropolymer, elastomer, and other specialized compounds.
Before heating, the tubing has a larger diameter that allows it to slide over a wire, terminal, splice, or cable connection. When heat is applied, the tubing shrinks around the underlying component.
Common applications include:
- Wire insulation
- Cable joint protection
- Terminal insulation
- Electrical splices
- Strain relief
- Cable bundling
- Corrosion protection
- Mechanical protection
- Identification and labeling
- Waterproofing when using adhesive-lined tubing
Heat shrink tubing is available in different shrink ratios, meaning the amount by which its diameter can contract.
Heat Shrink Size Chart
The following chart provides common heat shrink tubing sizes for general electrical and wiring applications.
| Nominal Size | Approx. Expanded ID | Typical Application |
|---|---|---|
| 1/16 in | 1.6 mm | Very small wires and components |
| 3/32 in | 2.4 mm | Small wire connections |
| 1/8 in | 3.2 mm | Small electrical wires |
| 3/16 in | 4.8 mm | Wire splices and terminals |
| 1/4 in | 6.4 mm | Medium wire connections |
| 3/8 in | 9.5 mm | Larger wires and terminals |
| 1/2 in | 12.7 mm | Cable joints and bundles |
| 3/4 in | 19.1 mm | Larger cable assemblies |
| 1 in | 25.4 mm | Large cable bundles |
| 1-1/4 in | 31.8 mm | Large cables and assemblies |
| 1-1/2 in | 38.1 mm | Large cable protection |
| 2 in | 50.8 mm | Large cable bundles |
| 3 in | 76.2 mm | Very large cable assemblies |
| 4 in | 101.6 mm | Large industrial applications |
Actual dimensions vary by manufacturer and product series, so the manufacturer’s dimensional specification should be checked before selecting a specific product.
Understanding Heat Shrink Tubing Sizes
Heat shrink tubing is generally identified by its expanded inside diameter or nominal size.
For example, tubing described as 1/4 inch heat shrink may have an expanded inside diameter close to 1/4 inch, depending on the product.
However, the nominal size alone does not tell you whether the tubing will properly fit your application.
You also need to consider:
- Expanded inside diameter
- Recovered inside diameter
- Shrink ratio
- Wall thickness
- Material
- Temperature rating
- Cable diameter
- Connection dimensions
This is why reading the manufacturer’s size specifications is important.
Expanded Diameter vs Recovered Diameter
Two measurements are especially important when selecting heat shrink tubing.
Expanded Inside Diameter
The expanded inside diameter is the approximate internal diameter of the tubing before heating.
It needs to be large enough to slide over the wire, connector, terminal, or splice.
Recovered Inside Diameter
The recovered inside diameter is the approximate internal diameter after the tubing has been heated and fully shrunk.
It should be small enough to grip the underlying component securely.
For example, a tubing specification might look similar to:
1/2 inch expanded → 1/4 inch recovered
This indicates that the tubing starts at approximately 1/2 inch internal diameter and can shrink to approximately 1/4 inch.
Heat Shrink Ratio Chart
The shrink ratio describes how much the tubing can reduce in diameter.
| Shrink Ratio | General Characteristics | Typical Use |
|---|---|---|
| 2:1 | Shrinks to approximately half its supplied diameter | General wire insulation |
| 3:1 | Greater diameter reduction | Irregular connections |
| 4:1 | High shrink capability | Larger connectors and cable transitions |
| 6:1 | Very high shrink range | Complex cable assemblies |
| More than 6:1 | Specialized high-shrink products | Large transitions and irregular shapes |
A 2:1 heat shrink does not mean the tubing becomes exactly half its original length. The ratio normally refers to its diameter reduction.
For example, a 2:1 product may recover from approximately 10 mm to 5 mm internal diameter, depending on the manufacturer’s specifications.
How to Choose the Correct Heat Shrink Size
Choosing heat shrink tubing involves comparing the tubing’s dimensions with the dimensions of the component being covered.
Step 1: Measure the Largest Diameter
Measure the largest part that the tubing must pass over.
This could be:
- Wire insulation
- Cable jacket
- Wire splice
- Terminal
- Connector
- Soldered joint
Step 2: Check the Expanded Diameter
The tubing’s expanded inside diameter should be sufficiently larger than the largest part it needs to pass over.
If the tubing barely fits, installation can become difficult.
Step 3: Check the Recovered Diameter
The recovered diameter should be small enough to grip the wire or connection after heating.
Step 4: Consider the Shrink Ratio
A 2:1 product works well when the starting and final diameters are relatively close.
A 3:1 or 4:1 product may be more suitable for connections with significant changes in diameter.
Step 5: Check Wall Thickness
Heavy-wall tubing provides more mechanical and environmental protection than thin-wall tubing.
Heat Shrink Size by Wire Gauge
Heat shrink tubing does not have a one-to-one relationship with wire gauge because the finished diameter of a wire depends on its insulation type.
The following table is a general starting reference.
| Wire Gauge | Typical Wire Category | Heat Shrink Size to Evaluate |
|---|---|---|
| 22 AWG | Small signal wire | 1/16–3/32 in |
| 20 AWG | Small control wire | 3/32–1/8 in |
| 18 AWG | Small electrical wire | 1/8 in |
| 16 AWG | Small power wire | 1/8–3/16 in |
| 14 AWG | General power wiring | 3/16–1/4 in |
| 12 AWG | Medium power wiring | 1/4–3/8 in |
| 10 AWG | Larger power wire | 3/8–1/2 in |
| 8 AWG | Heavy-duty wiring | 1/2–3/4 in |
| 6 AWG | Heavy power wiring | 1/2–3/4 in |
| 4 AWG | Large power conductors | 3/4–1 in |
| 2 AWG | Large electrical conductors | 1–1-1/4 in |
| 1/0 AWG | Large power cable | 1-1/4 in and larger |
These are starting points rather than universal specifications. Always measure the actual outside diameter of the insulated wire or connection.
Heat Shrink Size Chart in Millimeters
Metric heat shrink tubing is commonly specified by its expanded diameter.
| Nominal Size | Approx. Diameter | General Application |
|---|---|---|
| 1.5 mm | 1.5 mm | Tiny wires and components |
| 2 mm | 2 mm | Small signal wires |
| 3 mm | 3 mm | Small wire connections |
| 4 mm | 4 mm | Small electrical joints |
| 6 mm | 6 mm | General wire connections |
| 8 mm | 8 mm | Medium wires |
| 10 mm | 10 mm | Larger wire connections |
| 12 mm | 12 mm | Cable joints |
| 16 mm | 16 mm | Medium cable assemblies |
| 20 mm | 20 mm | Larger cables |
| 25 mm | 25 mm | Cable bundles |
| 30 mm | 30 mm | Larger cable assemblies |
| 40 mm | 40 mm | Large cables |
| 50 mm | 50 mm | Large cable bundles |
The actual expanded and recovered dimensions vary according to the specific tubing design.
Heat Shrink Size for Wire Splices
Wire splices often require slightly larger tubing than the original wire because the splice creates a larger diameter.
For example, if two wires are joined with a connector or soldered splice, measure the largest outside diameter of the completed joint, not just the wire itself.
A good selection should:
- Slide over the splice without excessive force
- Cover the complete connection
- Shrink tightly around the underlying insulation
- Provide sufficient overlap
- Avoid excessive unused space
For irregular splices, a higher shrink-ratio product may be easier to install.
Discover More:
Heat Shrink for Terminals and Connectors
Terminals and connectors can have significantly larger dimensions than the cable they are attached to.
This is especially important with:
- Ring terminals
- Butt connectors
- Spade terminals
- Crimp connectors
- Cable lugs
- Battery terminals
- Automotive connectors
Measure the largest section that the tubing must pass over before selecting the size.
If the tubing is being installed over a crimp terminal, the tubing must be large enough to slide over the terminal before shrinking.
Adhesive-Lined Heat Shrink Size Chart
Adhesive-lined heat shrink tubing contains an internal adhesive that melts as the tubing is heated.
It is commonly used when additional sealing and environmental protection are required.
Typical applications include:
- Outdoor wiring
- Automotive wiring
- Marine electrical connections
- Cable joints
- Moisture-prone environments
- Corrosion protection
When selecting adhesive-lined tubing, account for the additional material and recovered dimensions specified by the manufacturer.
The tubing should have enough expanded diameter to pass over the connection while still providing a tight recovered fit.
Heat Shrink Wall Thickness
Heat shrink tubing can be classified broadly by wall thickness.
Thin-Wall Heat Shrink
Thin-wall tubing is commonly used for:
- Wire insulation
- Color coding
- Small repairs
- Electrical identification
- Lightweight protection
Medium-Wall Heat Shrink
Medium-wall products provide greater mechanical and environmental protection.
They can be used for:
- Cable joints
- Terminal connections
- Industrial wiring
- Automotive applications
Heavy-Wall Heat Shrink
Heavy-wall tubing is designed for applications where additional mechanical strength, sealing, or environmental resistance is required.
It is often used for:
- Large cable connections
- Underground cable systems
- Industrial electrical work
- High-demand cable protection
Heat Shrink Tubing Temperature
Different heat shrink materials require different heating temperatures.
Common materials include:
- Polyolefin
- PVC
- Fluoropolymer
- Silicone
- Elastomer
Do not assume that every heat shrink product can be heated at the same temperature.
Follow the manufacturer’s recommended recovery temperature and heating procedure.
A heat gun is generally preferred over an open flame because it provides more controlled heating.
Discover More:
Heat Shrink vs Electrical Tape
Heat shrink tubing and electrical tape can both provide insulation, but they behave differently.
| Feature | Heat Shrink Tubing | Electrical Tape |
|---|---|---|
| Insulation | Excellent when properly selected | Good |
| Mechanical protection | Good to excellent | Limited to moderate |
| Appearance | Clean and professional | Depends on installation |
| Installation | Requires heating | Simple application |
| Moisture sealing | Excellent with suitable adhesive-lined types | Product-dependent |
| Permanent fit | Shrinks around the connection | Remains wrapped |
Heat shrink is particularly useful when a neat, durable, and mechanically secure covering is desired.
Common Heat Shrink Size Mistakes
Choosing Tubing That Is Too Small
If the tubing cannot slide over the connection, it cannot be installed correctly.
Choosing Tubing That Is Too Large
Oversized tubing may not recover tightly enough around the wire or component.
Ignoring the Shrink Ratio
A 2:1 product may not accommodate a large difference between the connection diameter and cable diameter.
Measuring Only the Wire
Always measure the largest part that the tubing needs to pass over.
Ignoring Wall Thickness
Two products with the same nominal diameter can have different recovered wall thicknesses.
Using the Wrong Material
A product designed for general indoor wiring may not be appropriate for high-temperature, chemical, outdoor, or high-flex applications.
Overheating the Tubing
Excessive heat can damage the tubing, insulation, or underlying component.
How to Install Heat Shrink Tubing
Proper installation is straightforward.
1. Cut the Tubing
Cut a piece long enough to cover the required area with sufficient overlap.
2. Slide It Into Position
Place the tubing over the wire or connection before making the final connection whenever possible.
3. Complete the Connection
Make the appropriate electrical splice, crimp, solder joint, or terminal connection.
4. Position the Tubing
Center the heat shrink over the area that needs protection.
5. Apply Controlled Heat
Use a suitable heat source and heat the tubing evenly.
6. Allow It to Cool
Do not move or stress the tubing until it has cooled and recovered.
The exact heating method should follow the tubing manufacturer’s instructions.
Discover More:
Frequently Asked Questions
How do I know what size heat shrink tubing I need?
Measure the largest diameter of the connection that the tubing must pass over. Choose tubing with an expanded inside diameter larger than that measurement, then confirm that its recovered diameter will shrink tightly around the underlying wire or cable.
What does 2:1 heat shrink mean?
A 2:1 heat shrink ratio means the tubing can recover to approximately half of its supplied internal diameter under the specified recovery conditions. For example, tubing that starts around 10 mm may recover to approximately 5 mm, depending on the product.
What size heat shrink should I use for 12 AWG wire?
For 12 AWG wire, heat shrink in the 1/4 to 3/8 inch range may be a useful starting point, but actual wire insulation diameter varies. Measure the finished connection and compare it with the tubing’s expanded and recovered dimensions.
Can heat shrink be too big?
Yes. If heat shrink tubing is excessively large, it may not recover enough to grip the wire or connection properly. Choose a size that fits over the largest component while allowing the tubing to recover tightly around the final assembly.
What is the difference between 2:1 and 3:1 heat shrink?
The primary difference is the amount of diameter reduction available. 3:1 tubing can accommodate a greater difference between its initial and final diameter than 2:1 tubing, making it useful for irregular connections and larger transitions.
Conclusion
A heat shrink size chart makes it easier to select tubing for wires, terminals, splices, connectors, and cable assemblies. However, the nominal size should only be the starting point.
For accurate selection, check the expanded inside diameter, recovered inside diameter, shrink ratio, wall thickness, material, temperature rating, and actual cable or connection diameter.
For simple wiring applications, 2:1 polyolefin heat shrink is often a practical choice. For larger diameter changes or irregular connections, 3:1 or higher shrink-ratio tubing may provide a better fit. Adhesive-lined and heavy-wall products can provide additional sealing and mechanical protection where required.
Always compare the actual tubing specifications with the application before installation.